
Offroad Coilover Installation and Adjustment Guide
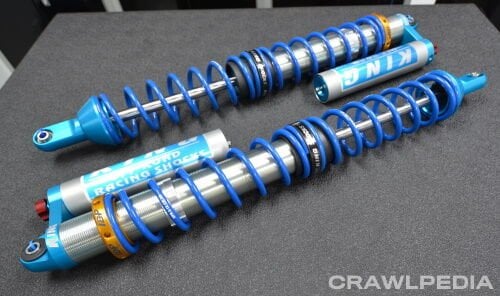
Step 1: Install Springs and Adjust Preload!
If your coilovers came without springs, the first step is to add springs. To do this, fully extend the shock by pulling on the shaft by hand. Then, if the lower spring plate came attached to the lower rod end, lift it up and slide it out of the slot on the shaft. (Some shocks use different spring plate designs, but sliding them up always reveals the seating mechanism.) Install the first spring by sliding it along the shaft until it contacts the upper spring retainer (the coil adjuster/preload nut). Remember, the lower-speed and/or shorter spring is always installed first. On two-speed coilovers, the slider is next, followed by the lower spring. On three-speed coilovers, the precision spring is installed at the top to be placed over the stop nuts during assembly. Finally, install the lower spring plate by passing it through the shock shaft and sliding it onto the lower rod end. Some coilover brands use slightly different designs, but this is the most common. Important: If your coilovers have a rubber or foam bumper stop on the shaft, the lower spring plate should be placed under the bumper stop (between the bumper stop and the lower rod end). The lower spring plate should always fit directly and securely onto the lower rod end of the coilover.
 Step 2: Install Coilovers and Check Your Springs
Safety First! Installing coilovers for the first time can be dangerous, so proceed with caution. This will require you to lift the vehicle high enough to be unstable, and it will also be the first time your upper and lower coilover mounts will be tested under the full weight of the vehicle. So, be sure to support the vehicle with jack stands, wear eye and ear protection, drive slowly, exercise caution, and use common sense. If you have any doubts, seek professional assistance with this process. Finally, be sure to use only Grade 8 or higher bolts, lock washers, and nuts.

Before installing your coilovers for the first time, it is highly recommended that you do a "dry install" (no springs installed, no pressure in the chambers) and fully work the suspension to check clearances, compression, component contact, and verify full compression and full extension positions.

With the vehicle chassis suspended and the suspension in full lean, install the coilovers using Grade 8 bolts, lock washers, and nuts. Check for play around the coilovers and then very slowly begin to lower the vehicle's weight onto them.
 How to Add Preload to Coilover?
Here's a photo showing how to use a cut-off screwdriver inserted into a coil nut. To add preload to your coilover springs, remove all the weight from the springs by lifting the vehicle's frame and allowing the suspension to drop. Then, using a coilover nut adjustment tool (we prefer a screwdriver with a nice handle that we cut off), turn the upper coil adjustment nut to the desired distance. A lubricant like WD-40 is also recommended. If the coilover adjustment nut has a locking screw, be sure to loosen it before making any adjustments and tighten it when finished. After making any preload adjustments, gently lower the vehicle weight back onto the coilovers. Hopefully, the vehicle has settled to your desired ride height. If not, repeat the above steps as necessary.

Important Note: Never adjust your preload based on the weight of the vehicle on the coilovers as this can damage the coilover cylinder and/or coilover nut, which are both expensive and difficult to replace.
 Pressurize the Coilovers
If your coilovers were shipped uncharged (collapsed), or if you've drained them to simplify the installation process, it's time to pressurize the shock with nitrogen. While different performance shocks and coilovers recommend pressures between 100 and 250 PSI, we generally find 150 PSI to be a great place to start.

A photo of the nitrogen fill kit components, tank, hose, regulator, and tire chucks
Use Nitrogen, Not Compressed Air: One of the most common questions we receive about charging shock absorbers is whether it's appropriate to use shop air instead of nitrogen. While compressed air effectively pressurizes the shock absorber, it also introduces moisture into the shock, which can cause the retaining rings to rust or seize. Nitrogen also maintains constant pressure much better and is less affected by increases in shock temperature.

To assemble a nitrogen fill kit, you'll need a nitrogen tank, a 400 PSI+ regulator, connecting hose, and an air chuck. All of these items can be found at a local welding supply store or often rented by the day.
 Step 4: Adjust Your Stop Nuts
Photo of a King coilover with reservoir, coil nut, stop nuts, and slider labeled. On dual-rate and triple-rate coilovers, the last thing you need to adjust are the stop nuts. The stop nuts thread into the cylinder below the coil adjustment nut and are used to adjust the transition point between the primary ratio (the junction of the upper and lower springs) and the lower spring (the secondary ratio).

For most applications, the stop nuts should be positioned approximately 1 to 3 inches (2.5 to 7.5 cm) above the slider (spring spacer) when the vehicle is at ride height. This means the first 1 to 3 inches (2.5 to 7.5 cm) of upward travel will be at the softer spring rate, then transition to the lower spring rate.

To move the stop nuts, use a flathead screwdriver and a hammer to tap the top nut up (turn right) and the bottom nut down (turn left). Some coilover brands use a rubber o-ring between the stop nuts to hold them in place, so be careful not to damage them. Turn the stop nuts to their new positions, then tighten them together and tap each nut lightly with the screwdriver and hammer.